
Why Knowing How to Prepare for a Move Out Cleaning Matters for Your Deposit
Learning how to prepare for a move out cleaning is the best way to protect your security deposit and keep your moving week stress-free. Moving is incredibly exhausting, and the last thing you want to do after packing boxes is spend your entire weekend scrubbing grease off a kitchen wall. If you are hiring professional move out cleaning services in Spokane, WA, getting your home ready beforehand ensures the team can work their magic without any delays. This guide breaks down the simple prep steps to get your rental ready so you can hand over your keys with confidence and focus on your exciting new start.
If you want to skip the stress entirely, check out our move cleaning services or book your cleaning online today.
Quick Summary: How to Prepare Your Home for a Move-Out Clean
If you are short on time, follow this quick checklist to ensure your home is ready for a professional deep clean:
- Clear the Space: Remove all furniture, moving boxes, and personal items from the home.
- Keep Utilities On: Ensure the electricity and running water remain active on the day of the clean.
- Remove All Trash: Clear out any leftover garbage or unwanted items before the cleaners arrive.
- Defrost the Fridge: Turn off and empty your refrigerator and freezer at least 24 hours in advance.
- Patch Small Holes: Fill tiny nail holes with spackle to make the final walkthrough a breeze.
When we pack up our lives and move from one home to another, our security deposit hangs in the balance. In the United States, average security deposits range from $600 to $2,500, which is a significant asset to leave on the table. One of the most common reasons landlords withhold some or all of this deposit is due to cleaning-related deductions.
Under Washington State law, specifically RCW 59.18.130, tenants are legally required to return the property to its original clean condition, minus normal wear and tear. Furthermore, RCW 59.18.280 dictates that landlords must provide a detailed, written statement explaining why any portion of a security deposit is being withheld. If you can present a professional cleaning receipt, you gain incredibly strong legal leverage against unfair deductions.
By understanding how to prepare for a move out cleaning, you make the process seamless. Whether you are tackling the job yourself or hiring a professional team, preparing the space allows for a deep, restorative clean that eliminates years of hidden grime. To get a better grasp of what a thorough move-out clean entails, read our guide on How to Do a Move-Out Cleaning to Get Your Deposit Back.
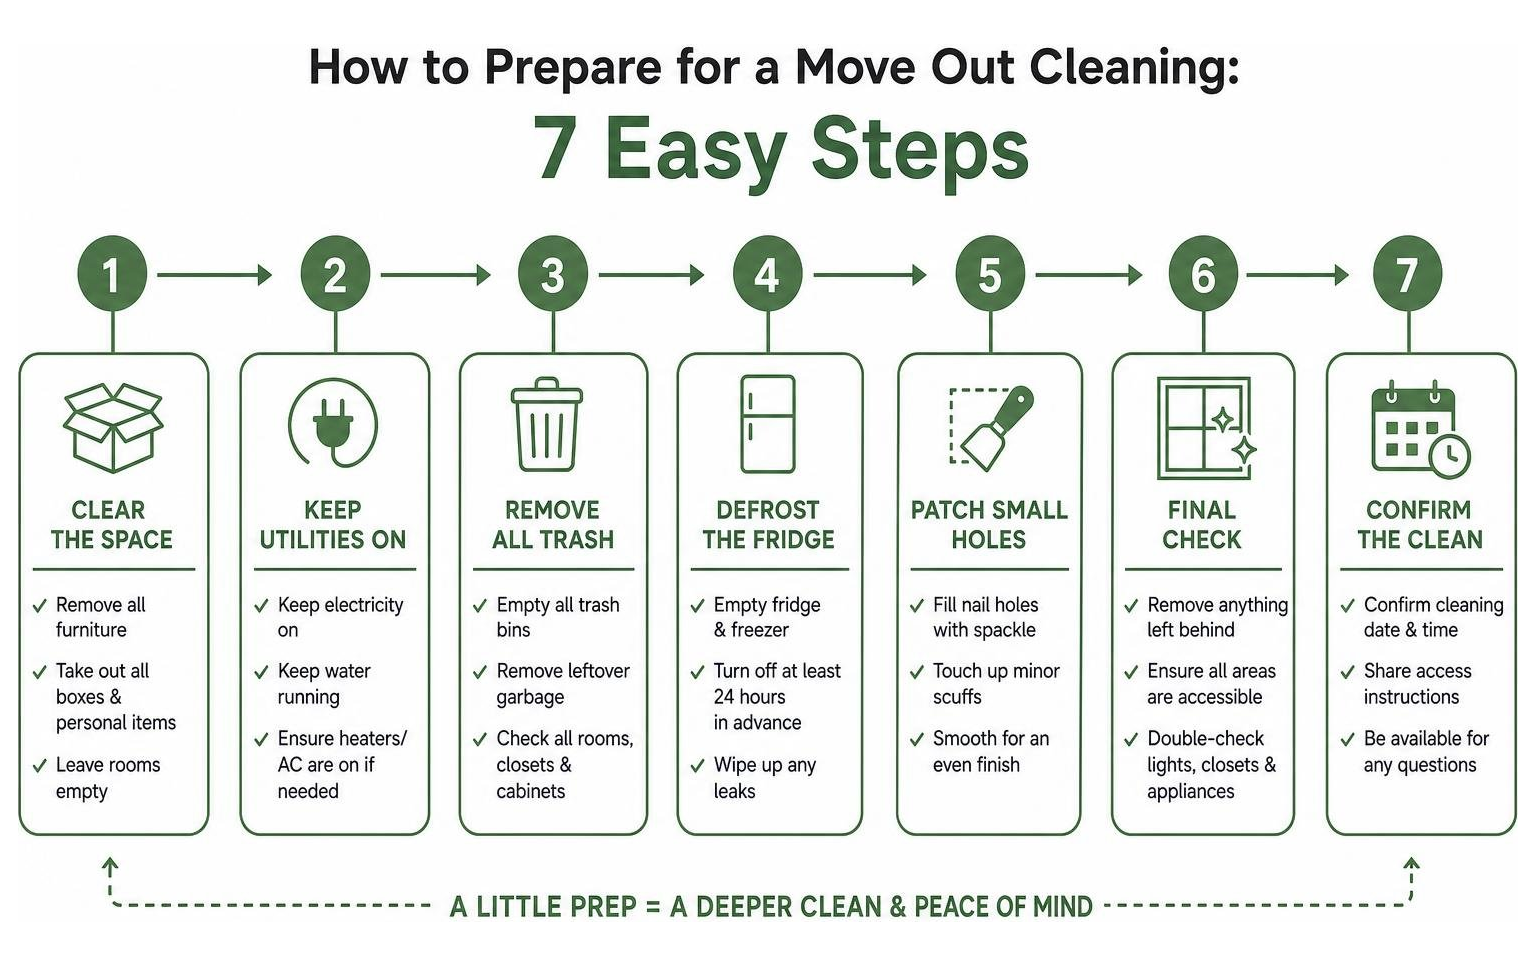
Simple how to prepare for a move out cleaning word guide:
7 Steps to Prepare Your Home for a Flawless Move-Out Clean
To get the most out of your move-out cleaning, a systematic preparation strategy is essential. Trying to clean around half-packed boxes or heavy furniture is an exercise in frustration. It leads to missed spots, wasted time, and unnecessary stress.
Before any microfiber cloth touches a surface, we must establish a clear game plan. We recommend following the “Empty House Rule,” ensuring all utilities remain active, and clearing out clutter. To learn more about how decluttering paves the way for spotless results, check out Clear the Clutter Before the Cleaner So Your Surfaces Can Shine.

Step 1: Empty the Entire Property First
The absolute golden rule of move-out cleaning is that the home must be completely empty. Trying to clean a room while moving boxes are stacked in the center makes it impossible to reach baseboards, corners, and floor registers.
- Remove All Furniture: Ensure every sofa, table, and bed frame has been loaded onto the moving truck.
- Clear Out Closets and Cabinets: Double-check the tops of shelves, deep drawers, and the backs of closets.
- Don’t Leave Trash Behind: Landlords frequently charge steep junk removal fees for items left behind, even if you thought you were doing the next tenant a favor by leaving a spare shower curtain or cleaning supplies.
If you are hiring a professional team, having an empty home increases cleaning efficiency by roughly 25%. For more guidance on preparing your living space for a seamless transition, see our article on How to Prepare Your Home for the Cleaner, Even If You’ve Never Tried It Before.
Step 2: Keep Your Utilities Active
A common mistake many tenants make is scheduling their utility shut-offs for the day they move their furniture out. However, if your move-out clean is scheduled for the following day, your cleaning crew will be left in the dark—literally.
- Electricity: Cleaners need power to run high-powered vacuums, see inside dark pantries, and spot fine dust on baseboards.
- Running Water: Hot water is a necessity for dissolving grease in the kitchen and descaling soap scum in the bathroom.
- HVAC System: Keeping the heating or air conditioning active at a comfortable level ensures that cleaning solutions dry at the correct rate and prevents moisture from lingering on freshly mopped floors.
Make sure your electricity and water remain active until at least 24 to 48 hours after your final cleaning is scheduled to take place.
Step 3: Gather Professional-Grade Supplies
If you decide to tackle the move-out clean yourself, you need to ditch the standard grocery-store spray bottle and paper towels. A professional-grade finish requires professional-grade tools.
Essential Move-Out Cleaning Supplies:
- Microfiber Cloths: Far superior to paper towels, microfiber traps dust and absorbs liquids without leaving behind lint or streaks.
- HEPA-Filter Vacuum: This is critical for capturing 99.97% of fine dust, pet dander, and allergens from carpets and crevices.
- pH-Neutral Floor Cleaners: Using harsh acidic or alkaline cleaners on hardwood or laminate floors can permanently damage the finish, risking your deposit.
- Heavy-Duty Degreaser: Necessary for breaking down baked-on grease on the stove backsplash and range hood.
- Squeegee: The best tool for achieving streak-free glass shower doors and mirrors.
- Spackling Paste and Putty Knife: For repairing wall blemishes.
Step 4: Handle Minor Repairs and Patching
Landlords look past dust, but they rarely overlook physical damage to the walls. Before you begin the deep clean, walk through each room with a small tub of lightweight spackling paste and a putty knife.
- Remove Nails and Anchors: Pull out all picture hooks, screws, and plastic anchors from the drywall.
- Patch the Holes: Apply a small amount of spackle to each hole, scrape it flush with the wall, and let it dry.
- Sand and Touch-Up Paint: Once dry, lightly sand the area smooth. If you have matching touch-up paint, gently dab it over the patched spots using a small foam brush.
- Re-Caulk if Necessary: Take a look at the seams around your bathtub and kitchen sink. If the caulk is cracked, peeling, or black with mold, scraping it away and applying a fresh line of white silicone caulk is one of the cheapest, highest-return DIY investments you can make to secure your deposit.
Step 5: Understand How to Prepare for a Move Out Cleaning by Room
To clean efficiently, you must follow a strategic order of operations. Professionals use the “Top-to-Bottom, Dry-to-Wet” rule. This means we always start by dusting high areas (ceiling fans, light fixtures, cabinet tops) so that falling debris lands on uncleaned surfaces below. We also complete all dry tasks (dusting, vacuuming) before starting wet tasks (wiping down surfaces, mopping) to prevent turning loose dust into muddy streaks.
For a detailed breakdown of how to structure your cleaning day, explore our 7 Move-Out Cleaning Checklist Tips for Beginners in Spokane.
| Room Type | Key Focus Areas | Estimated DIY Time |
|---|---|---|
| Studio / 1-Bed Apartment | Kitchen appliances, bathroom descaling, baseboards | 4 – 6 hours |
| 2-Bedroom Apartment | Window tracks, light fixtures, floor care | 6 – 8 hours |
| 3-Bedroom House | Multi-level dusting, garage sweeping, deep kitchen scrub | 10 – 14 hours |
Step 6: Deep Clean Overlooked Kitchen and Bathroom Zones
The kitchen and bathroom are the make-or-break rooms of any move-out inspection. These are the areas where grease, grime, mold, and mineral deposits accumulate over years of daily use.
Kitchen Hotspots:
- The Oven: Apply a foaming oven cleaner the night before to dissolve baked-on carbon without back-breaking scrubbing.
- Behind the Fridge and Stove: Pull these appliances away from the wall. You will be amazed (and slightly horrified) by the grease, dust, and dropped food that accumulates behind them.
- Dishwasher Seals: Wipe down the rubber gasket around the dishwasher door, which frequently traps mold and old food particles.
- Range Hood Filter: Soak the metal grease filter in hot, soapy water mixed with a heavy-duty degreaser, or replace it entirely for a few dollars.
Bathroom Hotspots:
- Shower Grout: Use a specialized grout brush and a descaling cleaner to remove stubborn orange soap scum and mildew.
- Mineral Deposits: Soak your showerhead in a bag of white vinegar overnight to dissolve mineral buildup and restore water flow.
- Vanity Drawers: Vacuum out the inside of all bathroom drawers to remove hair, makeup residue, and dust.
Step 7: Document Everything and Schedule the Walkthrough
Once the cleaning is complete, your final step is to create an undeniable paper trail to protect your security deposit.
- Take Time-Stamped Photos and Videos: Document every single room, closet, appliance interior, and repaired wall. Use your phone’s flashlight to show that the inside of the oven and refrigerator are spotless.
- Keep Your Receipts: If you hired professional carpet cleaners or bought replacement items (like a new HVAC filter or light bulbs), keep the receipts to prove you maintained the home.
- Schedule a Joint Walkthrough: Ask your landlord or property manager to walk through the empty, clean home with you. This allows you to address any minor complaints on the spot rather than receiving a surprise deduction in the mail.
- Provide Your Forwarding Address: Ensure you provide your new address in writing so your deposit check can be sent to you promptly.
DIY vs. Professional Services: When to Hire Help
Deciding whether to tackle your move-out clean yourself or hire a professional service comes down to a balance of time, energy, and risk. While DIY cleaning can save money upfront, the opportunity cost of spending 10 to 15 hours scrubbing a vacant home during an already exhausting move is incredibly high.
If you are moving out of a rental in Spokane, Spokane Valley, Mead, Airway Heights, or Liberty Lake, hiring a professional team like Maids of Movher is a strategic financial decision. Our experienced cleaning professionals bring commercial-grade equipment and eco-friendly, pet-safe products to ensure your home passes inspection. To understand the legal and practical standards required across Washington State, check out our Move-Out House Cleaning Washington Guide.
Comparison: DIY vs. Professional Move-Out Cleaning
| Feature | DIY Move-Out Cleaning | Professional Move-Out Cleaning |
|---|---|---|
| Time Investment | 10 – 15 hours of heavy labor | 0 hours (handled by professionals) |
| Supplies & Equipment | Must buy or rent (HEPA vacuums, steam mops, specialized degreasers) | Included (commercial-grade, eco-friendly) |
| Risk of Deposit Loss | Moderate to High (easy to miss hidden landlord hotspots) | Low (backed by professional standards) |
| Stress Level | High (juggling cleaning with moving logistics) | Low (peace of mind to focus on your new home) |
| Landlord Satisfaction | Subjective to landlord’s personal standards | High (supported by documented receipts and checklists) |
Frequently Asked Questions
How long does it take to prepare for a move out cleaning?
Preparing your home by packing up all personal items, removing trash, and emptying furniture typically takes 1 to 2 full days, depending on the size of your household. Once the home is empty, a thorough move-out clean itself takes 4 to 6 hours for a standard one-bedroom apartment, and up to 14 hours for a larger multi-bedroom home.
Do I need to patch nail holes before the cleaners arrive?
Yes, we highly recommend patching nail holes before your move-out clean. Standard cleaning packages do not include drywall repair or spackling. Taking 15 minutes to fill small holes with lightweight spackle prevents your landlord from charging expensive professional repair fees.
What is the difference between normal wear and tear and damage?
Normal wear and tear refers to the natural deterioration of a property over time, such as slightly faded paint, minor scuffs on wood floors, or gently worn carpet in high-traffic areas. Damage, on the other hand, is caused by abuse or neglect, such as large holes in drywall, deep carpet stains from pets, cracked windows, or heavily burnt stovetops. Landlords cannot legally deduct from your deposit for normal wear and tear, but they will charge for damage.
Conclusion
Preparing for a move-out clean doesn’t have to be an overwhelming ordeal. By following these 7 simple steps—emptying the property, keeping your utilities active, patching minor wall damage, and systematically cleaning from top to bottom—you can secure your full security deposit and make your transition incredibly smooth.
At Maids of Movher, we have been Making Homes Sparkle Since 2010. As a locally-owned and woman-owned residential cleaning company serving Spokane, Spokane Valley, Mead, Airway Heights, and Liberty Lake, we are deeply committed to our community. Our unique employee-first philosophy means we pay the highest wages in the area and offer consistent, reliable schedules with no nights or weekends. Because our employees are happy and well-supported, they treat cleaning as a long-term career, delivering unmatched quality and reliable service to our clients.
We are also proud partners of Cleaning for a Reason, providing free house cleaning services to cancer patients in our local communities to bring comfort and support when it is needed most. Whether you need recurring weekly cleans, a deep spring scrub, or a seamless move-out clean, we use safe, eco-friendly, and pet-friendly products to keep your home healthy.
Ready to reclaim your moving weekend and leave the heavy scrubbing to the professionals? Get your free estimate and book our move cleaning services today!
